Halloween: Wheelchair Costumes
The idea of a wheelchair costume is probably a 50/50 split of a craft project and an engineering challenge. I personally have definitely always seen it as a fun way to turn my son’s wheelchair into a platform for something fun. Here are some ways I have decked out our little guy’s chair for Halloween
For 2023
One key thing that makes costumes go well for my son is to keep the clothes part of his costume simple so he’s comfortable. With that in mind, I decided to go for a breakdancing costume.

Playing all the hits on the go.
For the electronic fun, I went back to using a Big Step-by-Step button and running a remote button and device off of it.

Time for tunes.

Plenty of wires and black tape.
The main engineering of this thing was relatively simple, it just took some time. Essentially, I went to a local hobby store and found a pair of LED desk party lights as well as wires and a battery pack and strung them together with a battery interrupter so they would work off the same electrical circuit when activated.
A test run of my electrical setup, with lights connected with a battery interrupter and connected to be run through the Big button.
The trick was keeping track of the flow of power. Positive connected to positve, then out the negative terminal on light #1 to the positive input on light #2, then out that light’s negative terminal to the battery interrupter before going back to the battery pack.
As far as programming the Big button, I had to read to remind myself that an external device will only turn on if you press the “record” button one while you’re recording the audio. Otherwise it will not turn on the external device when the audio plays.
After that worked, it was time to craft a boombox.

Much cutting and gluing.
A test of the constructed boombox before moving on to mounting it.
For materials, I have found that corrugated plastic sheets work much better than foamboard or any kind of cardboard. Craft foam and hot glue worked well to attach things, and small bolts and wingnuts worked well for securing everything together so it wouldn’t all crumble from its own weight.

Just about ready.
The part with the most guessing involved is always how to attach everything to the chair. This year I was mostly successful. The dowels fit in the holes for the canopy, but not snugly. I also used curtain rod corner mounts to hinge the dowels, but the screws came loose during the school day. It didn’t fall apart, but it was something to remember if there is a next time.
Adding a button attachment and securing it with velcro was very solid and a nice way for my son to activate everything himself without any help.
Time to dance.
All in all, it ended up being a fun costume that got a lot of attention while being fun to have all day long.
In 2022…
This is the year that I tried to keep things relatively simple, at least as far as the construction was concerned. And a train engineer costume seemed to fit the bill.

The little guy was perfectly comfortable in this year’s getup.
The overalls and hat were ordered online, and I sewed the bandana into a typical triangle bib from materials from my local craft store. The smoke stack was the majority of the work.

Double the work, twice the chance of making it through all of Halloween day with a costume.
First of all, I should mention that I made two of the train smoke stacks because every year any wheelchair costume comes back from school in pieces. Since the construction of this costume was much quicker than in the past, I just went ahead and doubled the effort.
The cylinder of the stack is made from black card stock held with double-sided tape. I made a pair of tails in the front that each tucked into an existing pocket on my son’s wheelchair backpack. The back of the stack is secured with Velcro straps to the handlebars, and I secured more where needed with duct tape in places to the chair for strength.
For the smoke, I cut a circle out of foam board, then ran some floral wire through the center and up around about 6-8 inches, then taped it securely to the circle. Around that, I put stuffing from the craft store and tied loops of white twine to hold the form together against the now-hidden center wire. It still jiggled but held in place just fine.
The headlight and whistle were put together with my grade school art skills, construction paper, spare card stock and foam board, and tape and glue.
But the favorite part for my son was playing sound effects with his Big Mac button.
The train sounds were a huge hit with everyone.
I recorded four different sound effects and message tracks, so it was always something a little different every time he pressed the button. Using the tray table also helped him grab into candy bowls and snatch out the stuff he wanted (even though he doesn’t actually eat candy).
All in all, a fairly straightforward costume that was a big hit.
In 2021…
With school being back in-person and a little more freedom to be out and about, I decided to tackle a fun Mario Kart costume this year that could also hold some necessities in its “trunk” since I had to make a rather boxy form anyway.

Gotta pick something for reference, so this was my basic Mario Kart go-to for styling.
The nice thing with Mario Kart is that you have a lot of flexibility to make a race car and add touches to bring it all together. So, in addition to the actual Mario clothes, I knew I wanted to make something to hang on the back of the wheelchair as well as some wheel covers.

Rocket boosters from floral foam and paper.
I found all my supplies between the local craft store and home improvement shops. I had to over-build it a little bit because I wanted to be able to put stuff in the back for school, so the rear section is made with PVC pipes with foam board taped around it with red tape, then spray painted. The rocket boosters are from floral foam cones that are painted and capped with yellow tape.

The rear box with spoiler and rocket boosters attached.
Looking back, I wish I had not used red duct tape to tape the foam board around the PVC frame, as the tape was still pretty obvious after painting. Also, using spray paint was tricky, and after adding more artwork to the outside, I realized that painting it with acrylic paint and then adding a gloss finish would have been faster and less work.

The rear box with more artwork.
The decals were made with glossy photo paper printouts of images I made in Photoshop that were sprayed with gloss sealer then cut out with a knife. This was really fun for me and helped bring it all together. All the decals were then coated with gloss decoupage glue.

Personalized Mario license plate.
And of course, with the wheel covers and outfit, it all looks sharp and fun.

Little Mario with his super star.

Looking good with his driving toy.

Poster board, foam pads, and battery-powered lights from Amazon make up the covers for the wheelchair wheels. Zip-ties held them on.

He didn’t love having his face covered, but he didn’t hate it either.
For 2020 I decided to go for R2-D2. I had originally looked into creating a dome and making all the pieces and on and on, but between remote learning and pandemic fatigue is quickly didn’t seem worth all the stress. But zip-up cosplay hoodies are awesome and wheel covers with lights are pretty good as well, so that’s the direction I went.

In other years…
The overall strategy for making a wheelchair costume is usually completely dictated by how much time you have to work on it. For 2019, I took some extra time and built Star Wars TIE Fighter panels to go on either side of the wheelchair, with lights triggered by a Big Mac button.

The result was pretty narrow but okay for one day.
Most of the TIE Fighter costume was built with handy little tricks. Craft stores sell cardboard presentation stands that are already made a certain color, so I just got black. And the reflective duct tape made things faster. The lines are just colored pencil. The whole thing is attached to the chair with a combination of thin wood secured with bolts and wing nuts to plastic plumber pipes zip-tied to the frame of the chair.
Psyched to wear pajamas all day at school.
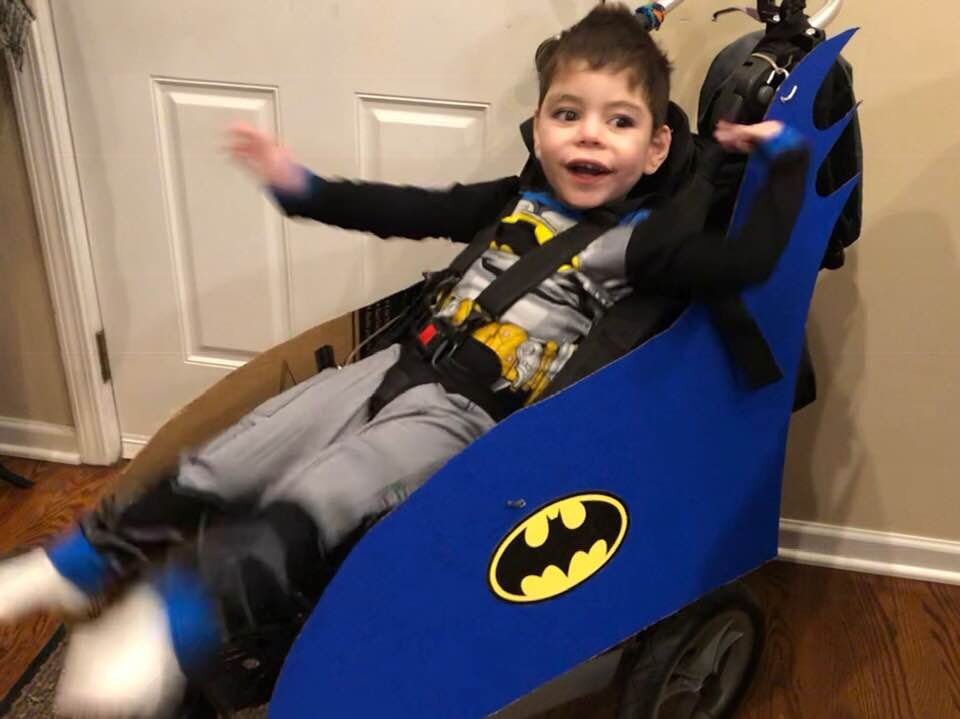
The Batmobile was another case of just using what’s easily out there. The craft store already had the blue cardboard, so I just drew the silhouettes and cut them out with my Xacto knife. It attached to the frame with S-hooks and zip-ties.
Overall, these would be my personal tips for working on a wheelchair costume:
See what’s already out there. Party City, Target, Walmart and others are adding pre-made wheelchair costumes every year, so there may already be something easy and perfect to pick up.
Visit craft and hardware stores while you’re still thinking. There are a lot of materials, lights and fasteners that will give you a good idea of what’s possible and what you personally are comfortable making.
Lights are cool. Amazon has a lot of battery-powered dew drop light strings. You can use a battery interrupter to work with switch devices and add something showy to the costume that’s not much more complicated than the stuff you’re probably already doing at home.
If your child speaks using a button or switch that needs a recorded sound, have a sibling or other young person record Halloween messages if possible.
If it feels overwhelming, move on to Plan B. Working on a wheelchair costume should feel like a fun hobby, not a stressful responsibility.